| Pen Name |
Nib Removable? |
Feed Removable? |
| A.G. Spalding & Bros BRFT180 Fountain Pen |
Yes, friction fit |
Yes |
| Art Alternatives Pen & Ink Sketch Fountain Pen |
Yes, friction fit |
Yes |
| Aurora Ipsilon Lacquer Fountain Pen
|
Yes, friction fit |
Yes |
| Aurora Style Gemstone Fountain Pen |
Yes, friction fit |
Yes |
| Aurora Style Rose Gold Fountain Pen |
Yes, friction fit |
Yes |
| Aurora TU Fountain Pen |
Yes, nib collar |
Yes |
| BENU Briolette Fountain Pen |
Yes, nib collar |
Yes |
| BENU Minima Fountain Pen |
Yes, nib collar |
Yes |
| BIGiDESIGN Ti Ultra Pen |
Yes, nib collar |
Yes |
| Caran d'Ache 849 Fountain Pen |
Yes, friction fit |
Yes |
| Conklin Duraflex Fountain Pen |
Yes, nib collar |
Yes |
| Conklin Herringbone Fountain Pen |
Yes, nib collar |
Yes |
|
Copic Comic Drawing Pen
|
No |
No |
| Diplomat Optimist Fountain Pen |
Yes, friction fit |
Yes |
| Eboya Ricchiku Fountain Pen |
Yes, friction fit |
Yes |
| Faber-Castell Design Ambition Fountain Pen |
Yes, nib collar |
Yes |
| Faber-Castell Design Ondoro Fountain Pen |
Yes, nib collar |
Yes |
| Faber-Castell E-Motion Fountain Pen |
Yes, nib collar |
Yes |
| Faber-Castell Essentio Fountain Pen |
Yes, nib collar |
Yes |
| Faber-Castell Loom Fountain Pen |
Yes, friction fit |
Yes |
| Faber-Castell NEO Slim Fountain Pen |
Yes, friction fit |
Yes |
| Fine Writing International Bronze Age Brass Fountain Pen |
Yes, nib collar |
Yes |
| J. Herbin Fountain Pen |
Yes, friction fit |
Yes |
| Karas Kustoms Fountain K Pen |
Yes, nib collar |
Yes |
| Karas Kustoms Ink Fountain Pen |
Yes, nib collar |
Yes |
| Kaweco AC Sport Carbon Fountain Pen |
Yes, nib collar |
Yes |
| Kaweco AL Sport Fountain Pen |
Yes, nib collar |
Yes |
| Kaweco Brass Sport Fountain Pen |
Yes, nib collar |
Yes |
| Kaweco Calligraphy Sport Fountain Pen |
Yes, friction fit |
Yes |
| Kaweco Chess Print Sport Fountain Pen |
Yes, friction fit |
Yes |
| Kaweco Classic Sport Fountain Pen |
Yes, friction fit |
Yes |
| Kaweco Dia2 Fountain Pen |
Yes, nib collar |
Yes |
| Kaweco Elegance Fountain Pen |
Yes, nib collar |
Yes |
| Kaweco Elite Fountain Pen |
Yes, nib collar |
Yes |
| Kaweco Frosted Sport Fountain Pen |
Yes, friction fit |
Yes |
| Kaweco Ice Sport Glow Highlighter Fountain Pen |
Yes, friction fit |
Yes |
| Kaweco Liliput Fountain Pen |
Yes, nib collar |
Yes |
| Kaweco Perkeo Fountain Pen |
Yes, friction fit |
Yes |
| Kaweco Skyline Sport Fountain Pen |
Yes, friction fit |
Yes |
| Kaweco Special AL Fountain Pen |
Yes, nib collar |
Yes |
| Kaweco Steel Sport Fountain Pen |
Yes, nib collar |
Yes |
| Kaweco Student Fountain Pen |
Yes, nib collar |
Yes |
| Kaweco Supra Fountain Pen |
Yes, nib collar |
Yes |
| Kuretake Yumeginga Dream Galaxy Antler Fountain Pen |
Yes, nib collar |
Yes |
| LAMY 2000 Fountain Pen |
Yes, inserted |
No |
| LAMY ABC Fountain Pen |
Yes, friction fit |
No |
| LAMY Aion Fountain Pen |
Yes, friction fit |
No |
| LAMY AL-Star Fountain Pen |
Yes, friction fit |
No |
| LAMY CP1 Fountain Pen |
Yes, friction fit |
No |
| LAMY Dialog 3 Fountain Pen |
Yes, inserted |
No |
| LAMY Joy Calligraphy Pen |
Yes, friction fit |
No |
| LAMY Logo Fountain Pen |
Yes, friction fit |
No |
| LAMY Lx Fountain Pen |
Yes, friction fit |
No |
| LAMY Nexx Fountain Pen |
Yes, friction fit |
No |
| LAMY Safari Fountain Pen |
Yes, friction fit |
No |
| LAMY Scala Fountain Pen |
Yes, friction fit |
No |
| LAMY Studio Fountain Pen |
Yes, friction fit |
No |
| LAMY Vista Fountain Pen |
Yes, friction fit |
No |
| Monami Olika Fountain Pen |
Yes, friction fit |
No |
| Monteverde Jewelria Executive Fountain Pen |
Yes, nib collar |
Yes |
| Moonman 80 Fountain Pen |
No |
No |
| Moonman C1 Fountain Pen |
Yes, nib collar |
Yes |
| Moonman M2 Fountain Pen |
Yes, nib collar |
Yes |
| Moonman Wancai Mini Fountain Pen
|
Yes, nib collar |
Yes |
| Nagasawa Original Pro Gear Slim Fountain Pen |
Yes, friction fit |
Yes |
| Nagasawa Original Profit Jr. Skeleton Fountain Pen |
Yes, friction fit |
Yes |
| Nagasawa Profit Skeleton Proske Fountain Pen |
Yes, friction fit |
Yes |
| Nagasawa Pro Color Fountain Pen |
Yes, friction fit |
Yes |
| Nakabayashi Artnavi Fountain Pen |
No |
No |
| Noodler's Ahab Flex Fountain Pen |
Yes, friction fit |
Yes |
| Noodler's Konrad Flex Fountain Pen |
Yes, friction fit |
Yes |
| Noodler's Triple Tail Flex Fountain Pen |
Yes, friction fit |
Yes |
| Ohto Dude Fountain Pen |
Yes, friction fit |
Yes |
| Ohto Giza Fountain Pen |
Yes, friction fit |
Yes |
| Ohto Jazz Fountain Pen |
Yes, friction fit |
Yes |
| Ohto Proud Fountain Pen |
Yes, friction fit |
Yes |
| Ohto Tasche Fountain Pen |
Yes, nib collar |
Yes |
| Onishi Seisakusho Cellulose Fountain Pen |
Yes, friction fit |
Yes |
| ONLINE Slope Fountain Pen |
Yes, friction fit |
Yes |
| ONLINE Switch Plus Fountain Pen |
Yes, friction fit |
Yes |
| Opus 88 Demo Fountain Pen |
Yes, nib collar |
Yes |
| Opus 88 Koloro Fountain Pen |
Yes, nib collar |
Yes |
| Opus 88 Omar Fountain Pen |
Yes, nib collar |
Yes |
| Parker IM Fountain Pen |
Yes, friction fit |
Yes |
| Parker Sonnet Fountain Pen |
Yes, twist fit |
Yes |
| Parker Vector Fountain Pen |
Yes, friction fit |
Yes |
| Pelikan Classic M120 Fountain Pen |
Yes, nib collar |
No |
| Pelikan Classic M200 Fountain Pen |
Yes, nib collar |
No |
| Pelikan Classic M205 Fountain Pen |
Yes, nib collar |
No |
| Pelikan Classic P200 Fountain Pen |
Yes, nib collar |
No |
| Pelikan Pelikano Junior Fountain Pen |
Yes, friction fit |
Yes |
| Pelikan Souveran M600 Fountain Pen |
Yes, nib collar |
No |
| Pelikan Souveran M800 Fountain Pen |
Yes, nib collar |
No |
| Pelikan Souveran M805 Fountain Pen |
Yes, nib collar |
No |
| Pelikan Souveran M815 Fountain Pen |
Yes, nib collar |
No |
| Pelikan Souveran Stresemann M405 Fountain Pen |
Yes, nib collar |
No |
| Pelikan Twist Fountain Pen |
No |
No |
| Pentel Tradio Fountain Pen |
Yes, friction fit |
Yes |
| Pilot Capless Fermo Fountain Pen |
Yes, inserted |
No |
| Pilot Cavalier Fountain Pen |
No |
Yes |
| Pilot Custom 74 Fountain Pen |
Yes, friction fit |
Yes |
| Pilot Custom 823 Fountain Pen |
Yes, friction fit |
Yes |
| Pilot Custom 912 Fountain Pen |
Yes, friction fit |
Yes |
| Pilot Custom Heritage 92 Fountain Pen |
Yes, friction fit |
Yes |
| Pilot Custom Maple Fountain Pen |
Yes, friction fit |
Yes |
| Pilot Custom NS Fountain Pen |
Yes, friction fit |
Yes |
| Pilot Elabo Fountain Pen |
Yes, friction fit |
Yes |
| Pilot Elite 95S Fountain Pen |
No |
No |
| Pilot Falcon Fountain Pen |
Yes, friction fit |
Yes |
| Pilot Grance Fountain Pen |
Yes, friction fit |
Yes |
| Pilot Justus 95 Fountain Pen |
No |
No |
| Pilot Kakuno Fountain Pen |
Yes, friction fit |
Yes |
| Pilot Lady White Fountain Pen |
No |
No |
| Pilot Lucina Fountain Pen |
Yes, friction fit |
Yes |
| Pilot Maki-e Fountain Pen |
Yes, friction fit |
Yes |
| Pilot Metropolitan Fountain Pen |
Yes, friction fit |
Yes |
| Pilot Parallel Pen |
Yes, friction fit |
No |
| Pilot Penmanship Fountain Pen |
Yes, friction fit |
Yes |
| Pilot Petit1 Mini Fountain Pen |
Yes, friction fit |
Yes |
| Pilot Plumix Fountain Pen |
Yes, friction fit |
Yes |
| Pilot Prera Fountain Pen |
Yes, friction fit |
Yes |
| Pilot Vanishing Point Fountain Pen |
Yes, inserted |
No |
| Pilot Varsity Fountain Pen |
Yes, friction fit |
Yes |
| Pilot VPen Fountain Pen |
Yes, friction fit |
Yes |
| Platinum 3776 Century Fountain Pen |
Yes, friction fit |
Yes |
| Platinum Kanazawa Leaf Fountain Pen |
Yes, inserted |
Yes |
| Platinum Plaisir Fountain Pen |
Yes, friction fit |
No |
| Platinum Prefounte Fountain Pen |
Yes, friction fit |
No |
| Platinum Preppy Fountain Pen |
Yes, friction fit |
No |
| Platinum Procyon Fountain Pen |
Yes, friction fit |
No |
|
Regal 117 Alice Fountain Pen |
Yes, friction fit |
Yes |
| Regal 286 Author Fountain Pen |
Yes, friction fit |
Yes |
| Regal 503 Hadrian Fountain Pen |
Yes, friction fit |
Yes |
| Regal 82 William Fountain Pen |
Yes, friction fit |
Yes |
| Retro 51 Tornado Fountain Pen |
Yes, nib collar |
Yes |
| Rotring ArtPenCalligraphy Pen |
Yes, friction fit |
Yes |
| Sailor 1911 Fountain Pen |
Yes, friction fit |
Yes |
| Sailor Pro Gear Slim Fountain Pen |
Yes, friction fit |
Yes |
| Schmidt Intrinsic Fountain Pen |
No |
No |
| Tachikawa Comic Nib Fountain Pen |
No |
No |
| Tactile Turn Gist Fountain Pen |
Yes, nib collar |
Yes |
| Tombow Zoom 101 Carbon Fiber Fountain Pen |
Yes, friction fit |
Yes |
| TRAVELER'S COMPANY BRASS Fountain Pen |
Yes, friction fit |
Yes |
| TWSBI Classic Fountain Pen |
Yes, nib collar |
Yes |
| TWSBI Diamond 580 Fountain Pen |
Yes, nib collar |
Yes |
| TWSBI Diamond 580AL Fountain Pen |
Yes, nib collar |
Yes |
| TWSBI Diamond 580ALR Fountain Pen |
Yes, nib collar |
Yes |
| TWSBI Diamond Mini AL Fountain Pen |
Yes, nib collar |
Yes |
| TWSBI Diamond Mini Fountain Pen |
Yes, nib collar |
Yes |
| TWSBI ECO Fountain Pen |
Yes, friction fit |
Yes |
| TWSBI ECO-T Fountain Pen |
Yes, friction fit |
Yes |
| TWSBI GO Fountain Pen |
Yes, friction fit |
Yes |
| TWSBI Precision Fountain Pen |
Yes, nib collar |
Yes |
| TWSBI Vac Mini Fountain Pen |
Yes, nib collar |
Yes |
| TWSBI Vac700R Fountain Pen |
Yes, nib collar |
Yes |
| Visconti Van Gogh Fountain Pen |
Yes, friction fit |
Yes |
| VivaPen Space Fountain Pen |
Yes, friction fit |
Yes |
| Waldmann Edelfeder Fountain Pen |
Yes, nib collar |
Yes |
| Waldmann Pocket Fountain Pen |
Yes, nib collar |
Yes |
| Waldmann Solon Fountain Pen |
Yes, nib collar |
Yes |
| Waldmann Tango Fountain Pen |
Yes, nib collar |
Yes |
| Waldmann Tuscany Fountain Pen |
Yes, nib collar |
Yes |
| Waldmann Two-In-One Fountain and Ballpoint Pen |
Yes, nib collar |
Yes |
| Waldmann Xetra Vienna Fountain Pen |
Yes, nib collar |
Yes |
| Waterman Expert Fountain Pen |
Yes, friction fit |
Yes |
| Waterman Hemisphere Fountain Pen |
Yes, friction fit |
Yes |
| Waterman Perspective Fountain Pen |
Yes, friction fit |
Yes |
| Ystudio Desk Fountain Pen |
Yes, friction fit |
Yes |
| Ystudio Portable Fountain Pen |
Yes, friction fit |
Yes |
| Zebra Zensations Fountain Pen |
Yes, friction fit |
Yes |
| Zebra V301 Fountain Pens |
No |
No |


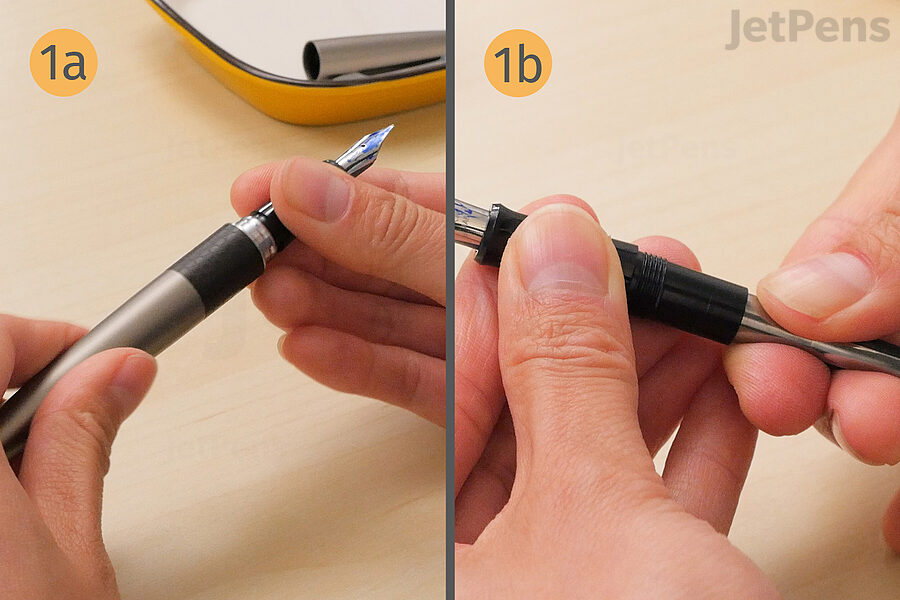

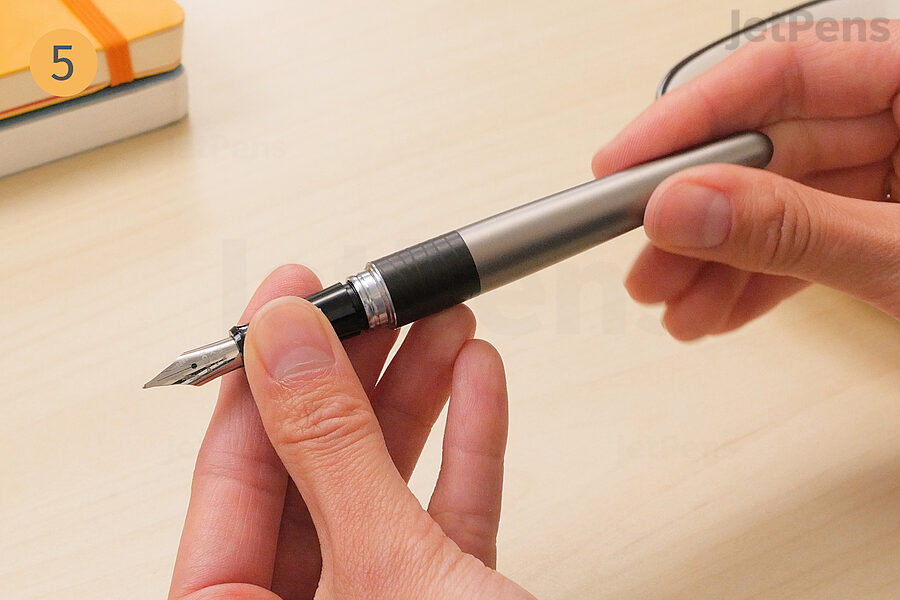
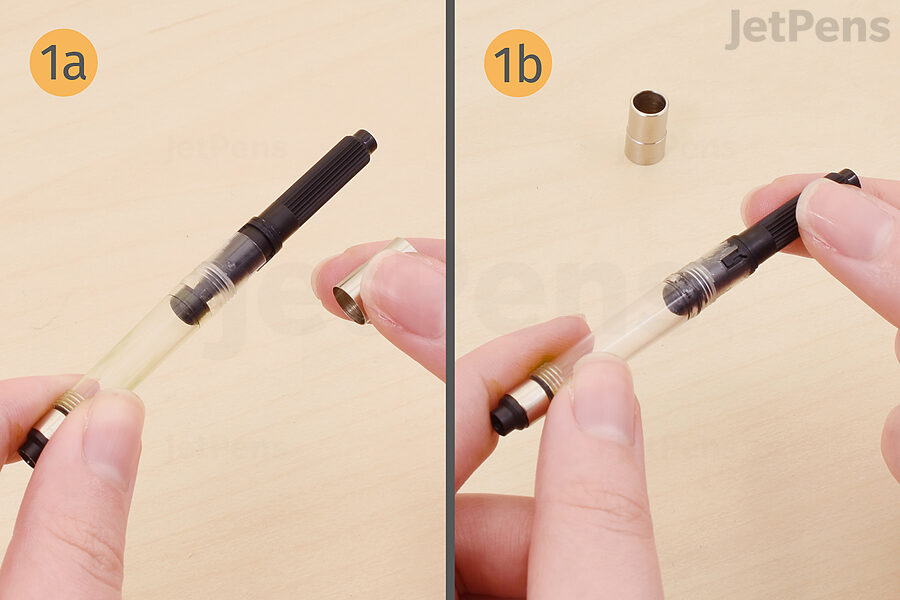
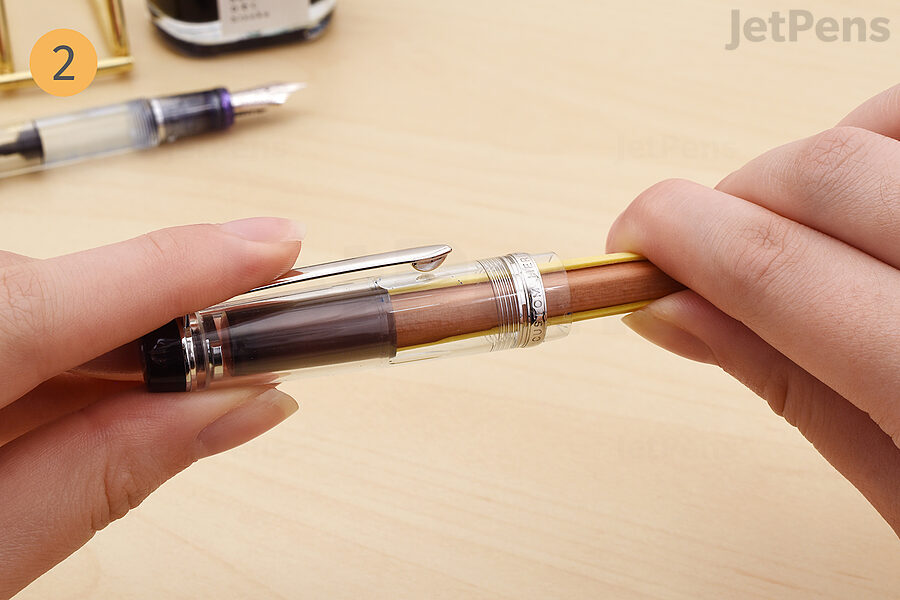
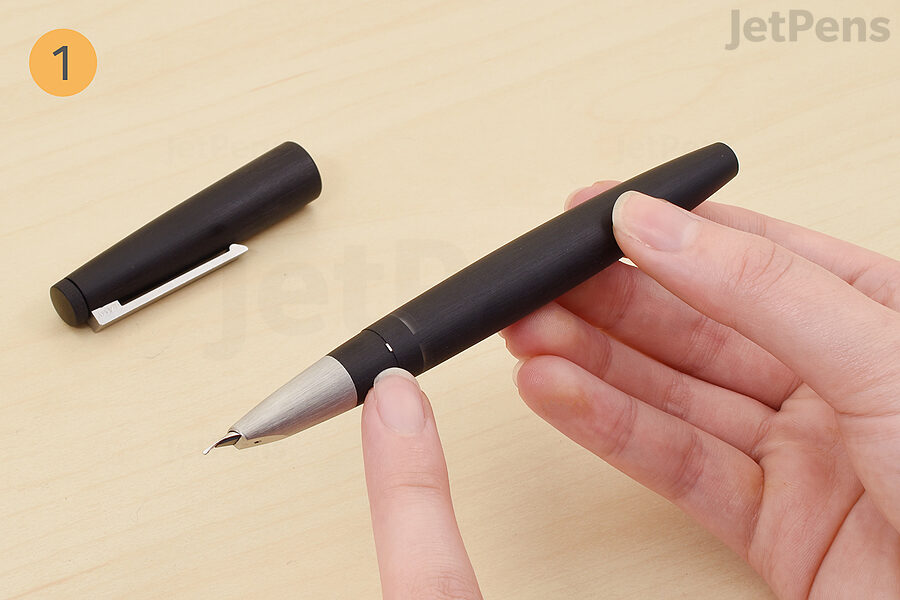
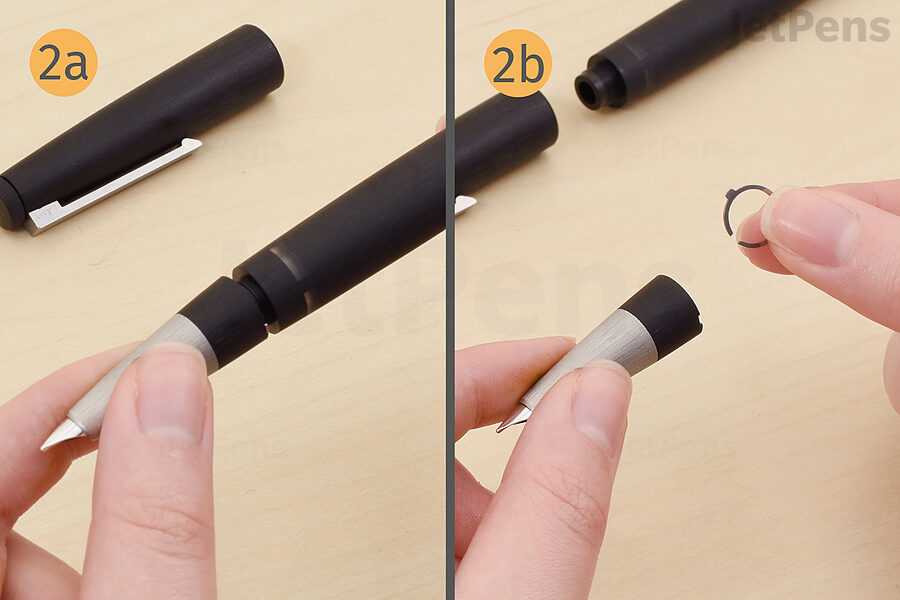
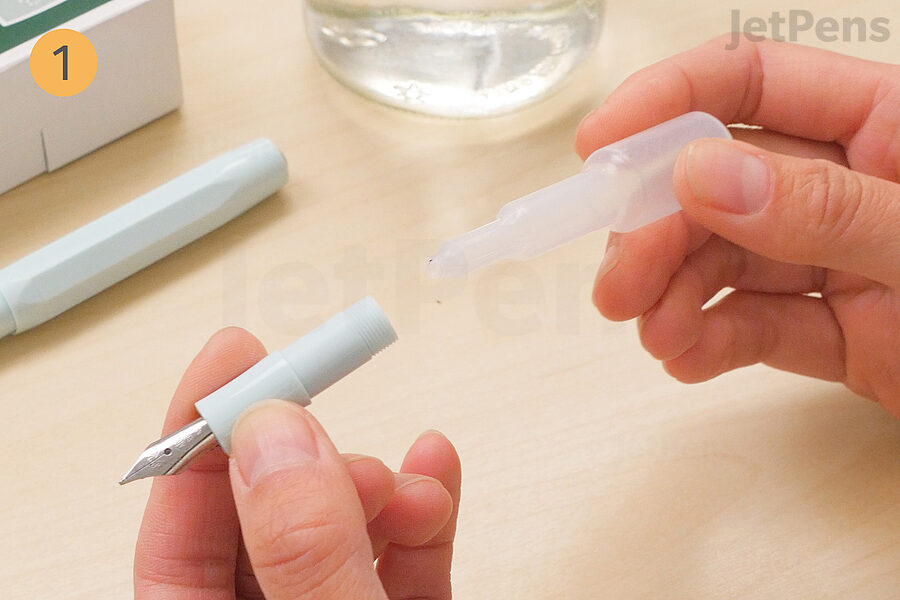 1. Remove the cartridge or converter and install the bulb into the grip section.
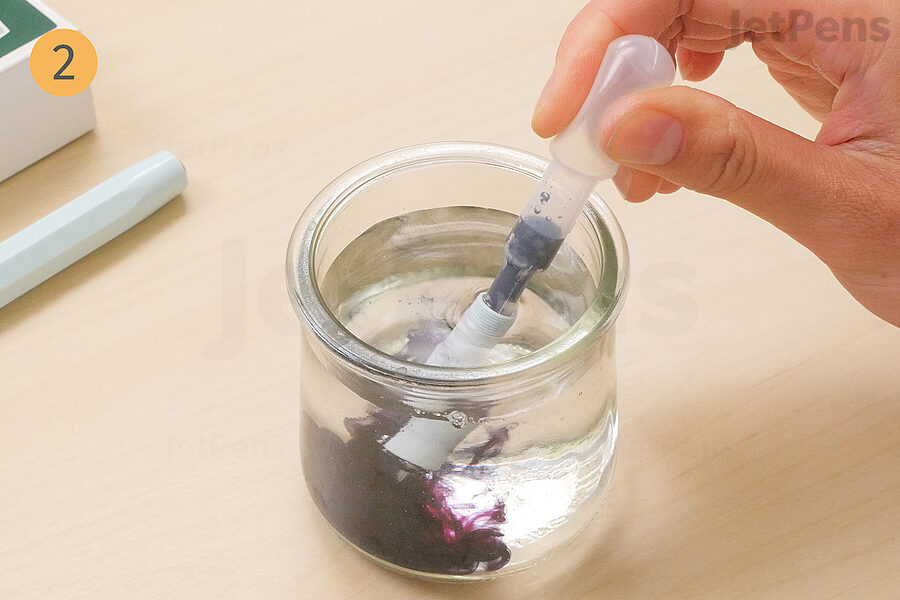 2.
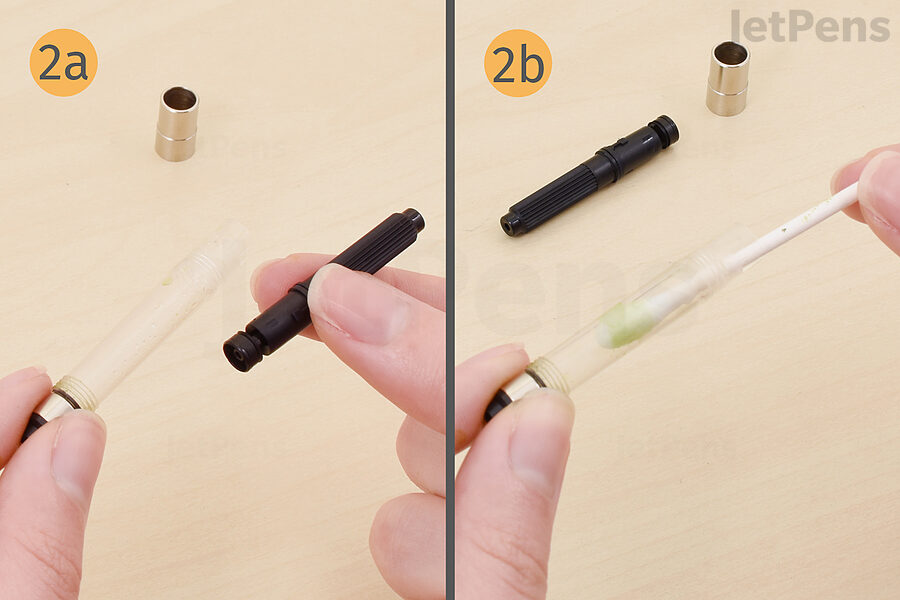
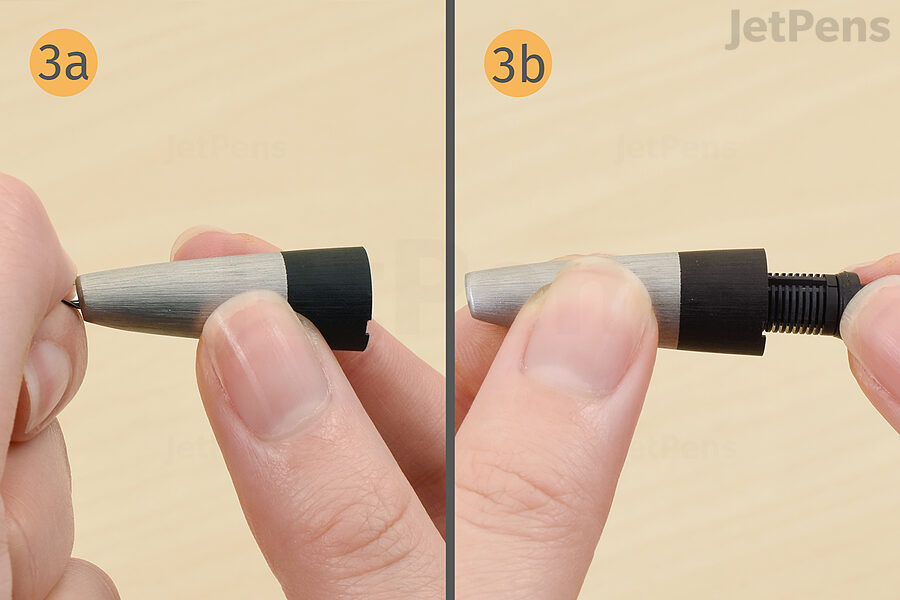
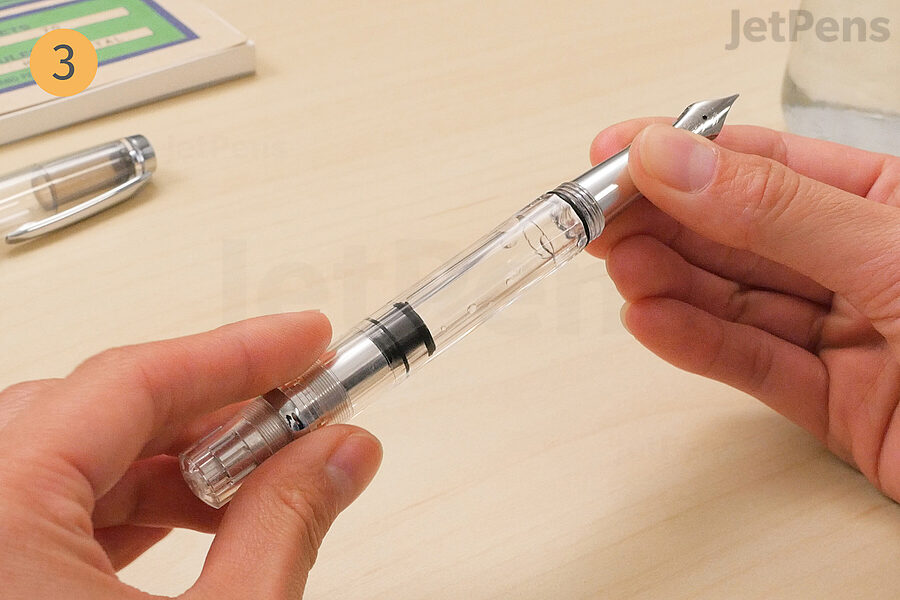
2. 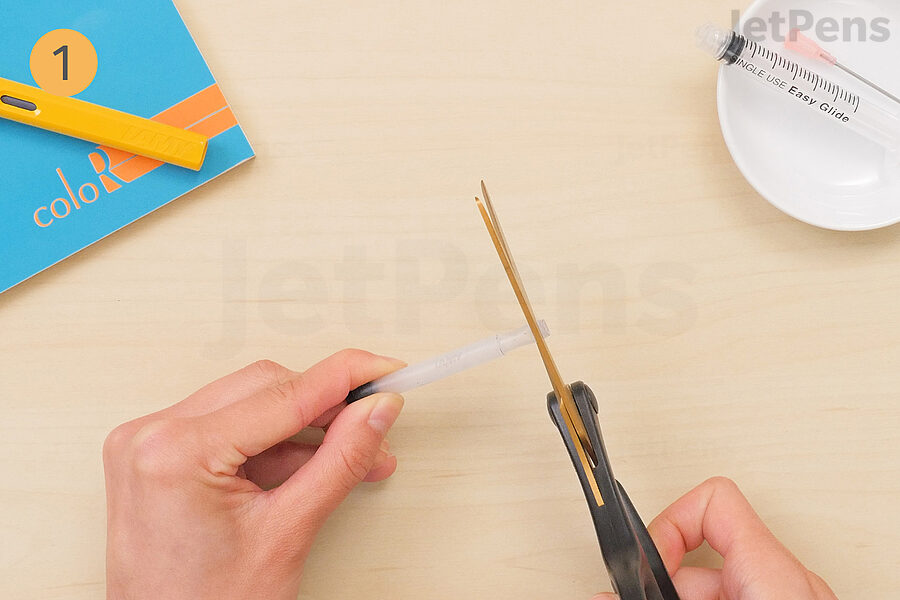 1. Cut the end of the cartridge to create an opening.
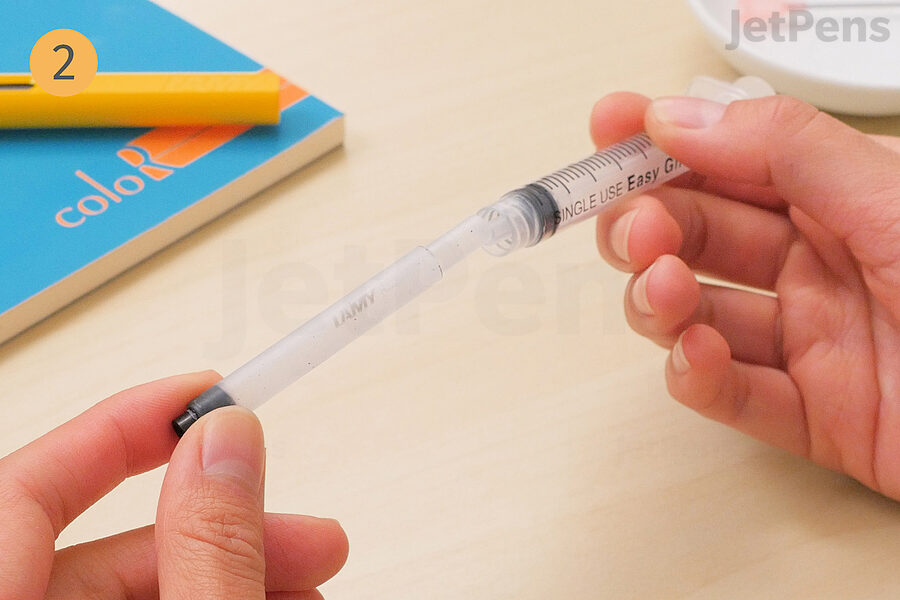 2. Insert the open end into the syringe.
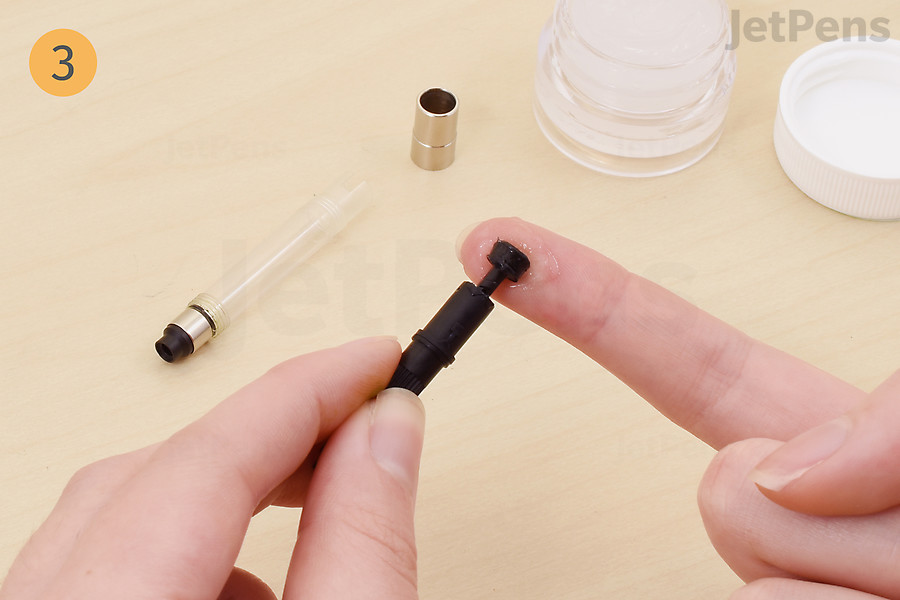
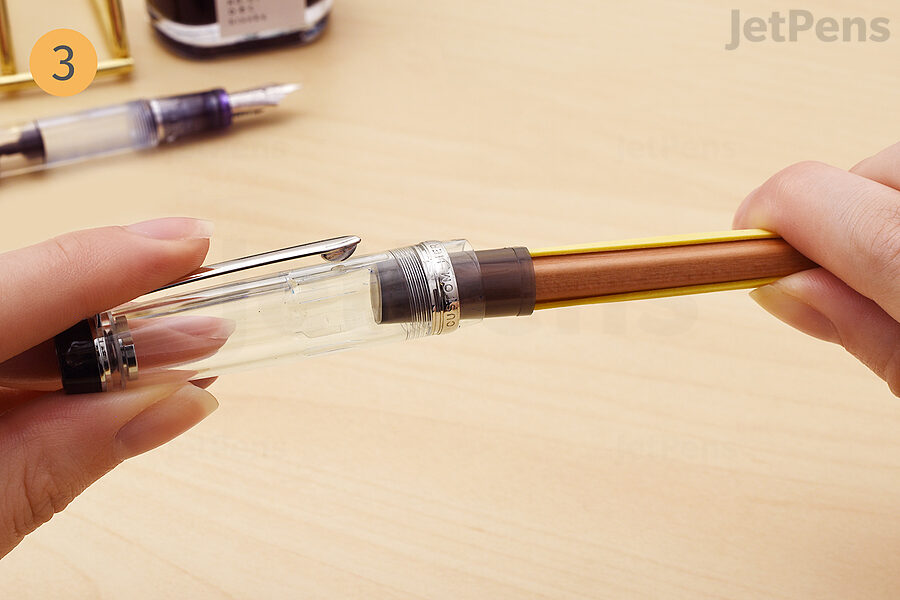
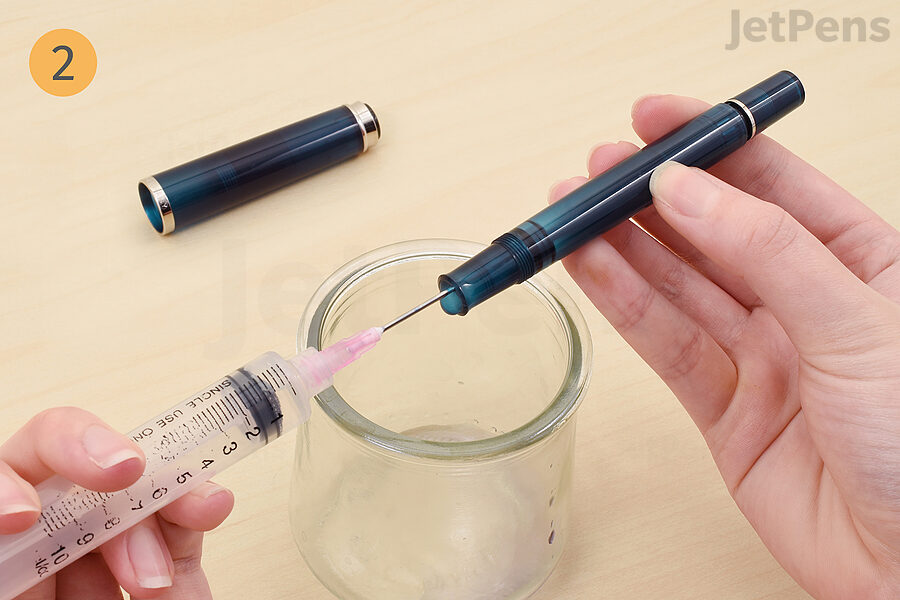
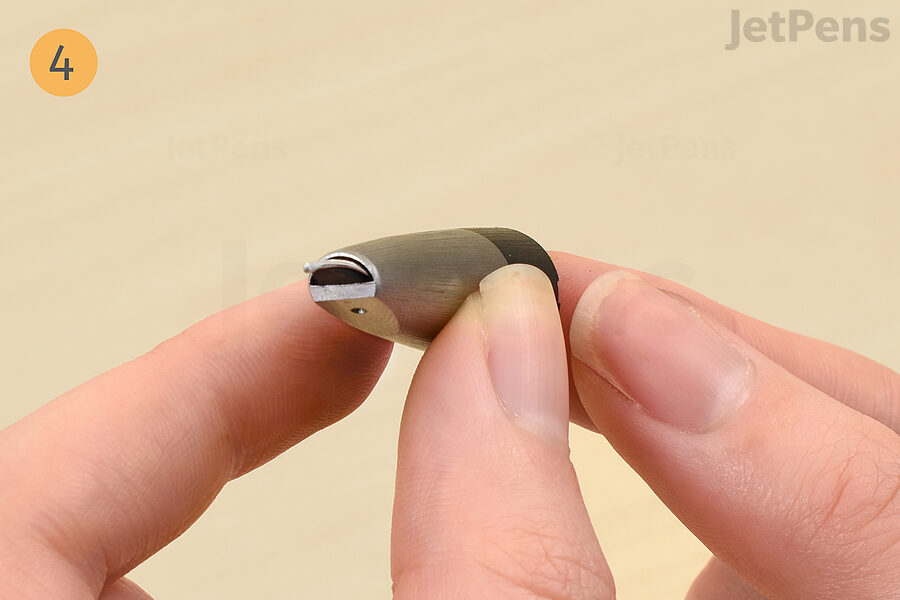
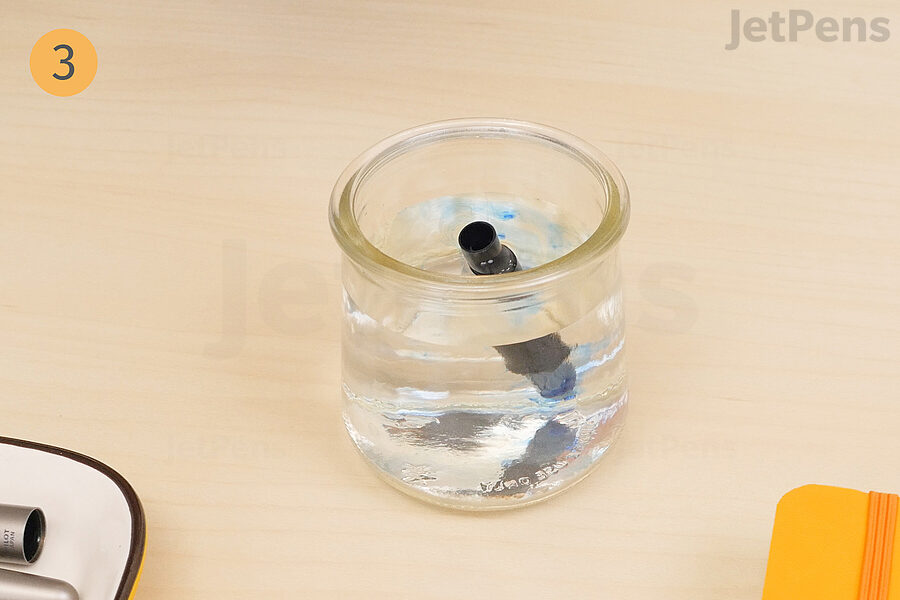
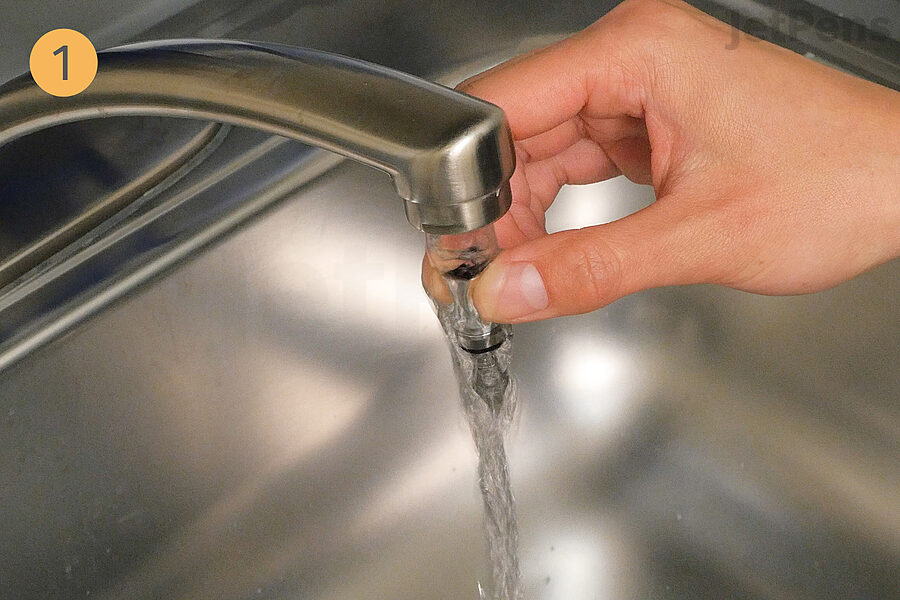
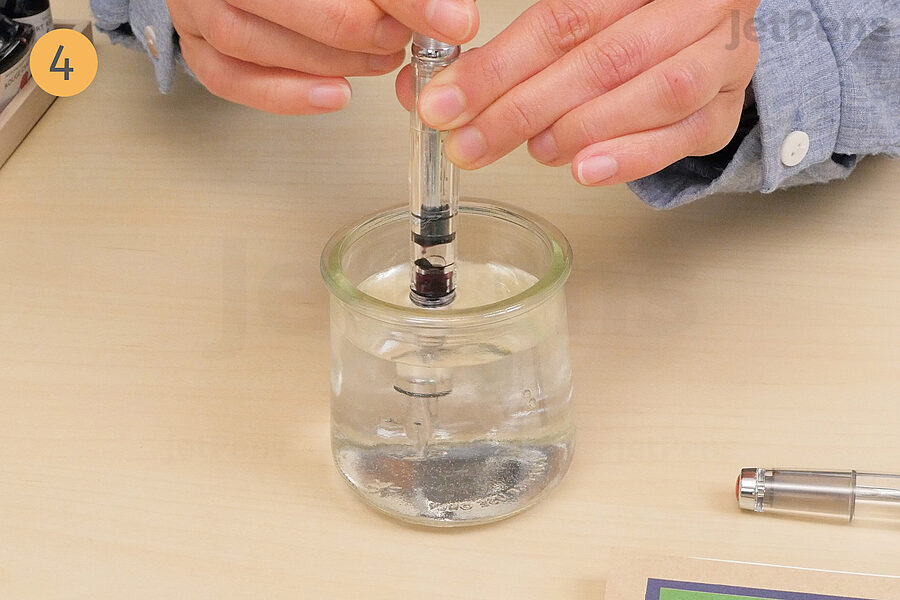
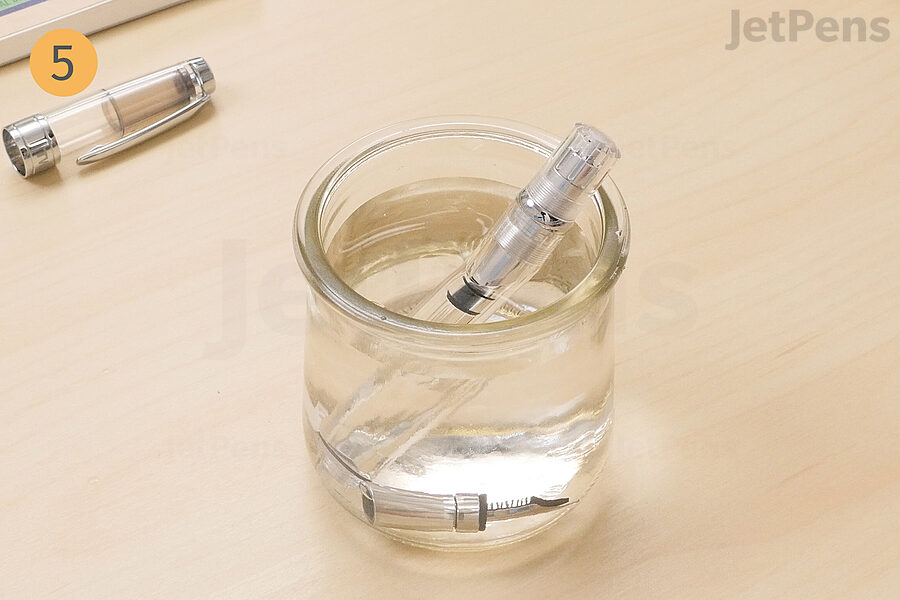
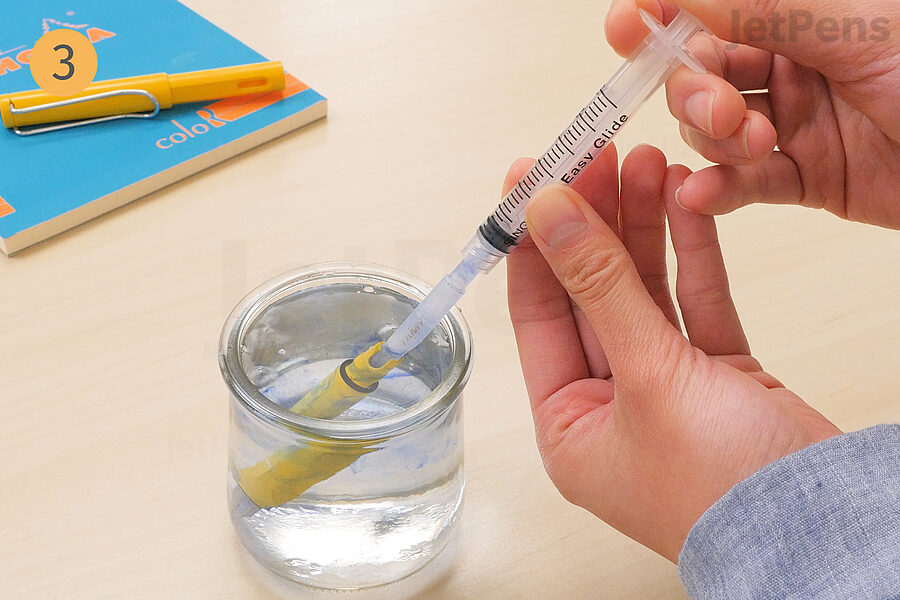 3. Install the cartridge into the grip section and dip into a cup of water.
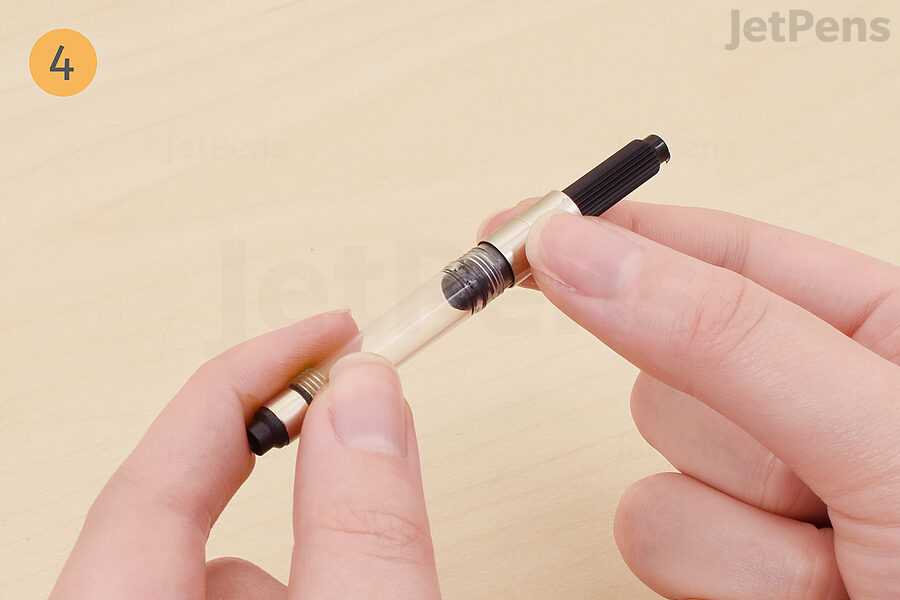
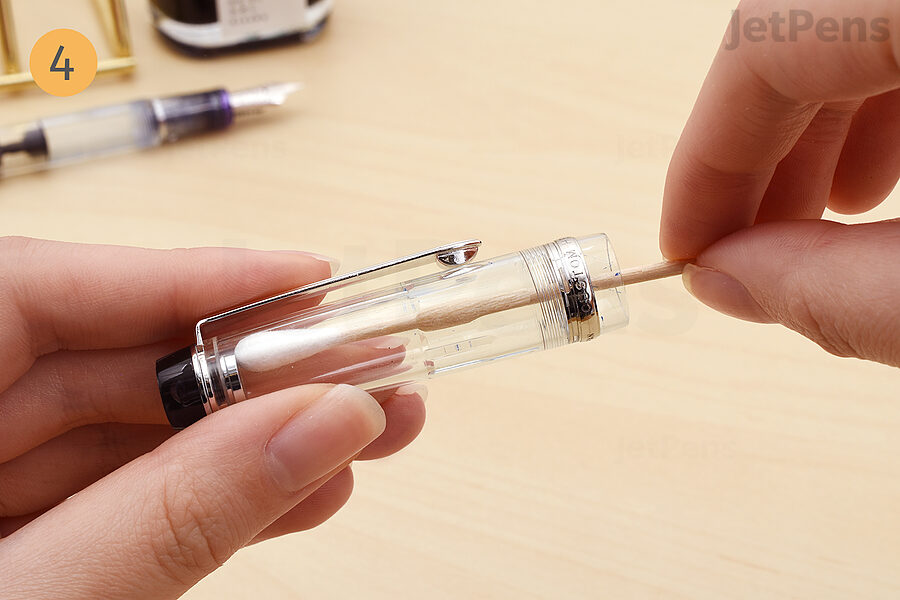
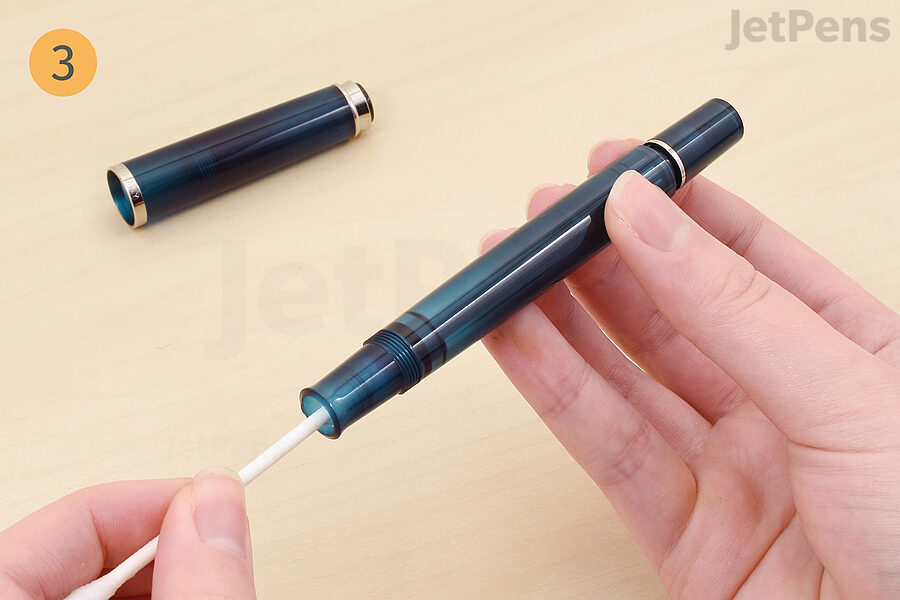
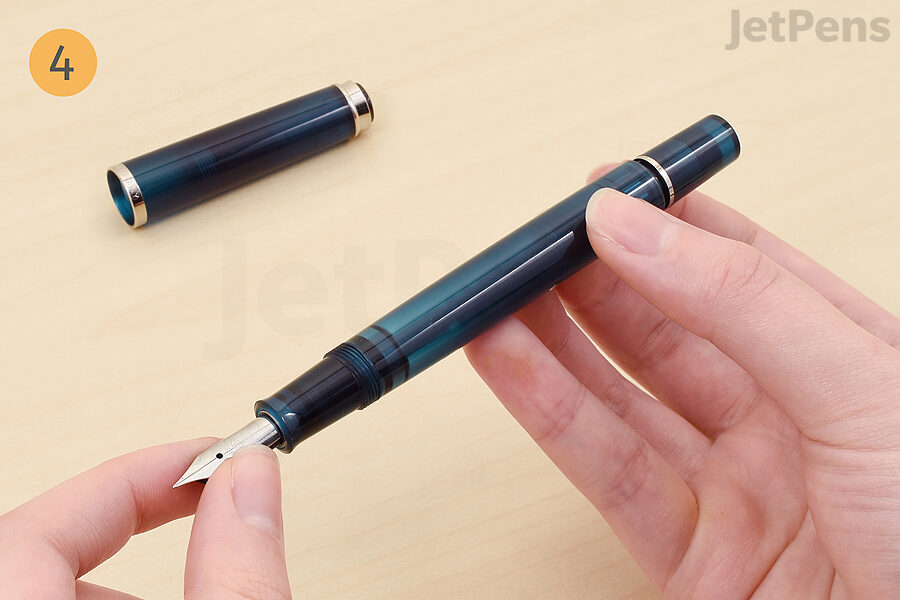
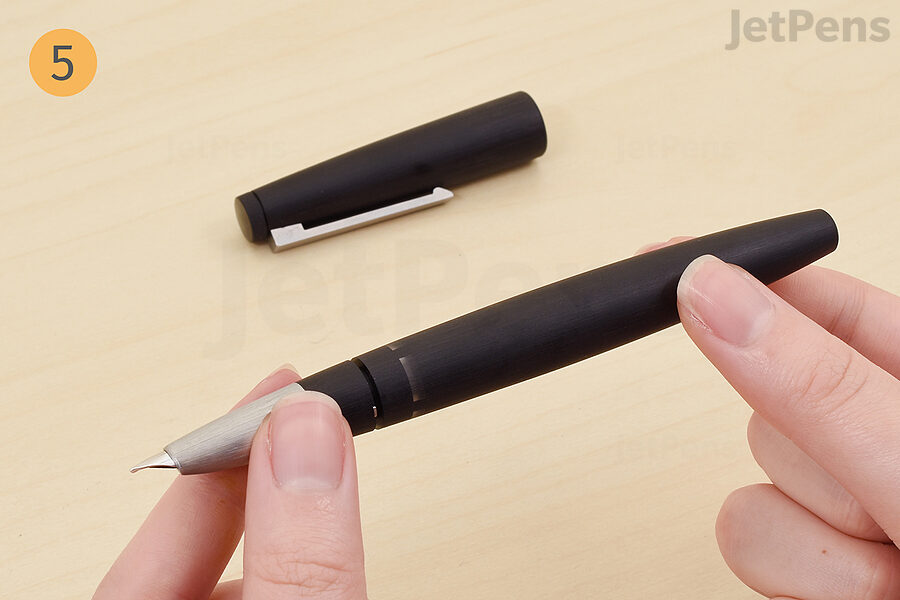
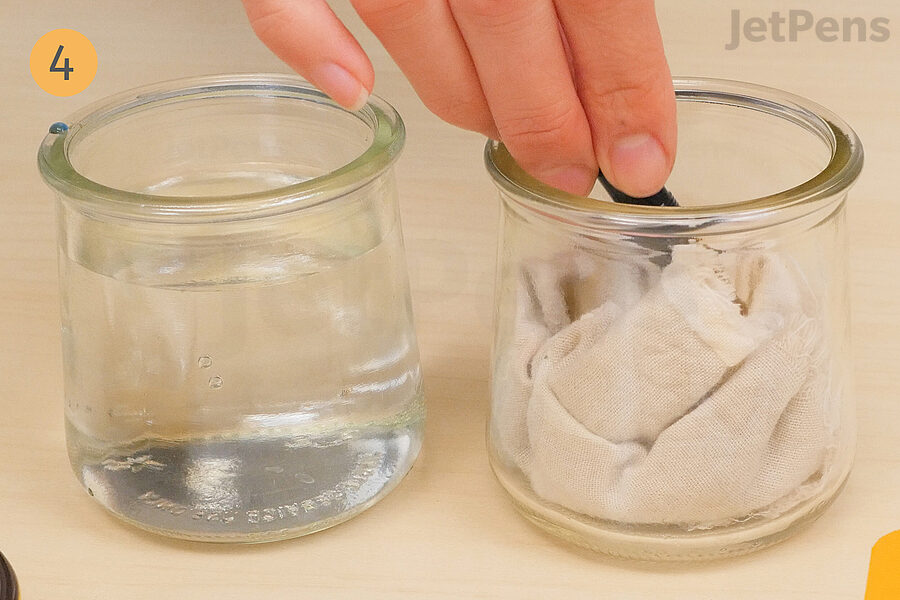
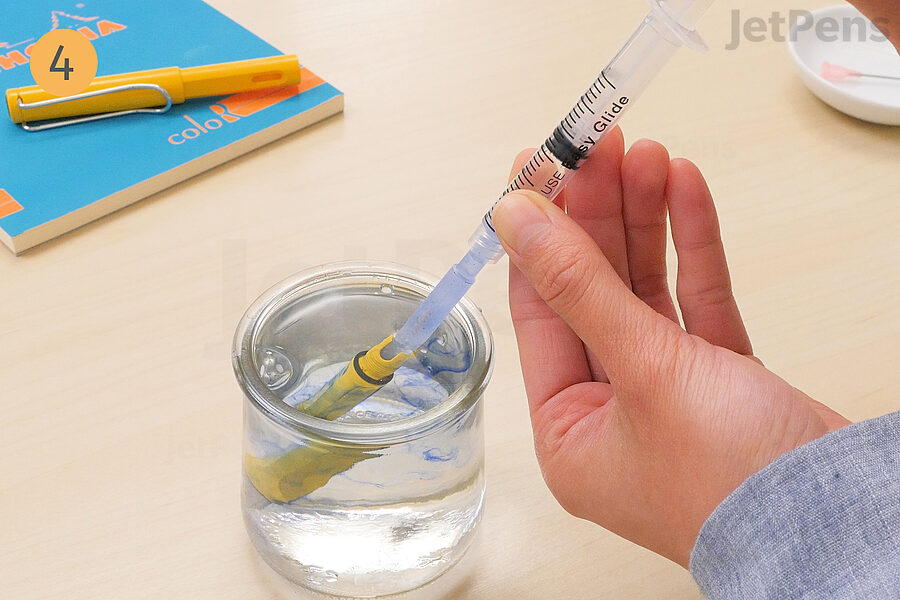 4. Use the syringe to draw up water and